DIY
I've become obsessed with looking at people's DIY projects, and it's made me want to do my own! So here is my list of DIY projects that I would like to complete. As I complete them I will post pictures and updates below =]
- Card Box - DONE!!!
- Monogram - DONE!!!
- Save The Dates - DONE!!!
- Honeymoon Registry Insert Cards - DONE!!!
- Invitations - DONE!!!
- Centerpieces - DONE!!!
Wedding Party Gifts - DONE!!! - Day of "Bride" jacket - DONE!!!
- Water Bottle Labels - DONE!!!
- Votive Wraps - DONE!!!
- Candy Buffet - DONE!!!
- Bathroom Baskets - DONE!!!
- Programs - DONE!!!
- Bubbles - DONE!!!
- "WE DO" letters for Cake Table - DONE!!!
- Door Hangers for "Getting Ready Rooms" - DONE!!!
- Table Numbers - DONE!!!
- Personalized glasses for head table members - DONE!!!
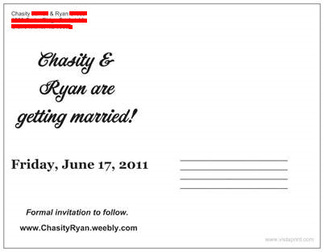
Save The Dates!
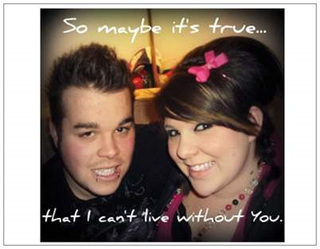
I made my Save The Dates using Vista Print. I just uploaded a picture of Ryan and myself for the front, and then I chose one of their fairly blank layouts for the back and filled it in with our information. It cost me $3.50 to upload my image on the front and about $6.50 for shipping, so in total I spent $10 on these little guys =]
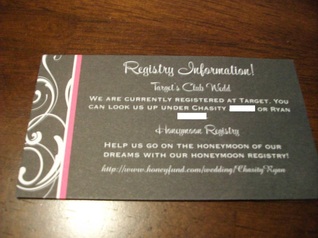
Registry Cards
I made my registry cards using one of my "250 free premium business cards" offers through Vistaprint. I included this with a bunch of other things I was ordering and shipping cost me less then $2.00!!
Monogram
Well, I decided after looking at a ton of other people's monograms online, that I hated mine, so when I saw a deal to have my monogram made for me for $2.50 I jumped on it. So these monograms were both made by www.ayleebits.com. Definitely check her out if you want a nice monogram for a cheap price.I got mine done when she was having a special, but her normal pricing is 2 for $5.
 |  |
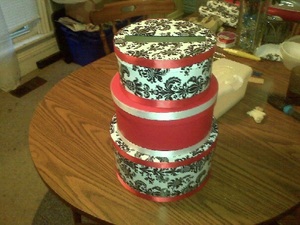
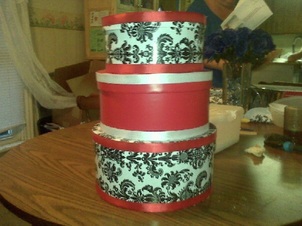
Cardbox
I started off by ordering 3 paper mache boxes off of Amazon. When the boxes came my Mom and I decided to take on this task together. We cut out a hole in the top of the smallest box for the cards, and then cut a hole in the bottom of the smallest box, the top and bottom of the middle box and the top of the biggest box so that the cards could fall all the way through. We then covered the top and bottom box in damask wrapping paper and the middle box in red wrapping paper. We then put red ribbon on the top and bottom of the damask boxes and white ribbon on the red box. I plan on getting some foam letters that spell out "CARDS" to put on the middle box and possibly line the opening of the card slit with diamonds to give it a little "bling." Overall this card box cost me approximately $15, but I love the way it turned out =]
 |  |
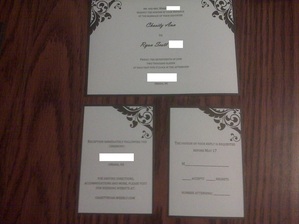
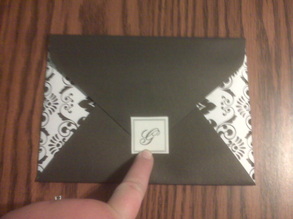
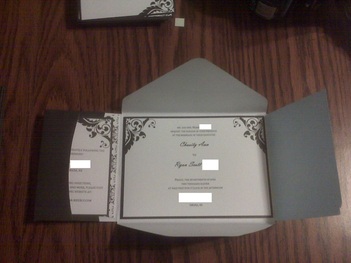
Invitations
For our invitations we decided to go with a DIY kit that we found at Michaels. I waited until Michaels had a 40% off coupon, and then Me, Ryan and Mom all took a coupon and went and got a kit. With the coupon each box of 30 invites cost about $22, so we got 90 invitations for $66.
Printing was super easy, and didn't take NEARLY as much ink as we thought it would! We had an ink cartridge in our printer that was about 1/4 full, so we bought an extra ink cartridge...we never used the extra. There is still ink in our cartridge. So that was super awesome as we didn't actually spend any money on ink (that I'm counting anyways).
The kit comes with all the pieces that you need, and then you can go to a website and download templates for microsoft word. Printing was easy. You just set the print settings to the size of the card, and then voila! I had absolutely no issues. Some people who used this said their paper got stuck...ours did the very first time as well, because we didn't set the printer right. If you check the paper size and set the printer beforehand, it's a breeze!
Postage for the invitations themselves are $.61 each, and then the RSVP included is $.44. So the total in postage for each invite is $1.05. You add in the $.73 we spent the buy them ($66 divided by 90 invites) and the total for our invitations were $1.78 each. =]
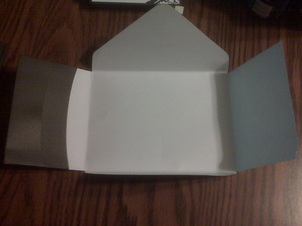
Here are some pictures I took as we were making them (I don't have the address label on the front or the sticker on the back sealed on yet obviously, but you get the idea).
Printing was super easy, and didn't take NEARLY as much ink as we thought it would! We had an ink cartridge in our printer that was about 1/4 full, so we bought an extra ink cartridge...we never used the extra. There is still ink in our cartridge. So that was super awesome as we didn't actually spend any money on ink (that I'm counting anyways).
The kit comes with all the pieces that you need, and then you can go to a website and download templates for microsoft word. Printing was easy. You just set the print settings to the size of the card, and then voila! I had absolutely no issues. Some people who used this said their paper got stuck...ours did the very first time as well, because we didn't set the printer right. If you check the paper size and set the printer beforehand, it's a breeze!
Postage for the invitations themselves are $.61 each, and then the RSVP included is $.44. So the total in postage for each invite is $1.05. You add in the $.73 we spent the buy them ($66 divided by 90 invites) and the total for our invitations were $1.78 each. =]
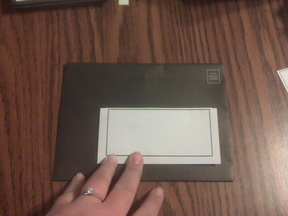
Here are some pictures I took as we were making them (I don't have the address label on the front or the sticker on the back sealed on yet obviously, but you get the idea).
 |  |
 |  |
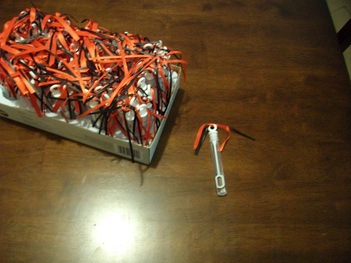
Bubbles
We decided to give bubbles out to our guests at the ceremony to use as we are walking back up the aisle. I wanted to dress them up a bit, so I cut black and red ribbon down to size and tied them around the loop at the top. Viola!
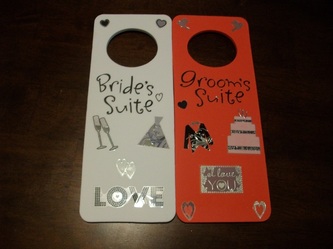
Door Hangers
For the morning of the wedding, Ryan and I each have a suite rented at the Hilton Garden Inn in Council Bluffs, one room for the girls to get ready in and one room for the guys. I decided to make door hangers for each room to give it a bit of a personal touch.
Cake Table Letters
I decided to dress up the cake table a bit. We got some wooden letters, painted them white, and gave them a little bling, to spell out "WE DO." I have a couple more stones to put on the "O" but other then that, they're done =]

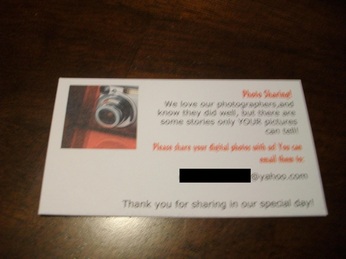
Photo Sharing Cards
These cards will be laid out around the reception for guests to take with them so that if they have any pictures they took that they would like to share, they can email them to us at our photo share email address. I made this using a 250 Free Business Card code from Vista Print (Sorry it's so blurry) so they only cost me about $1.00 in shipping.
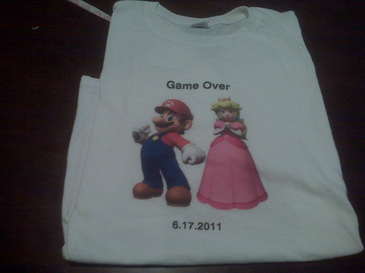
Ryan's "Day Of" Shirt
I had a coupon for a discounted shirt on Vista Print. I combined that with a free upload code and scored this baby for about $9 with shipping. =]
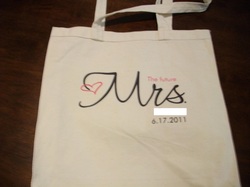
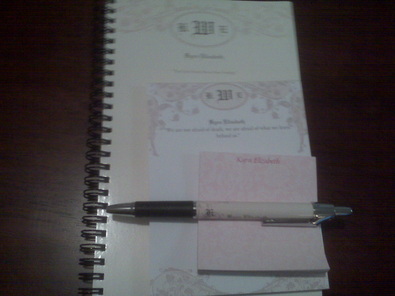
Bridal Party Gifts
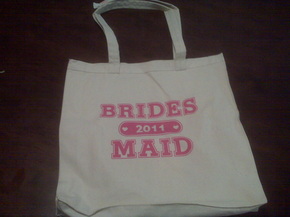
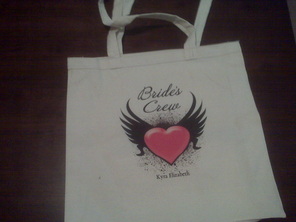
For the Bridal Party, I decided to make them all personalized stationary sets (as well as get them necklaces to wear on the day of the wedding, and help pay for hair/makeup). For these sets, I used codes from Vista Print to get a free: Tote Bag, Notebook, Notepad, Sticky Notes, Pen, and some people got a keychain. I just paid for shipping on it all, which cost me about $7 per person. I made one for each Bridesmaid, My Mom, Ryan's Mom and my 2 attendants. The BMs got Bridesmaids bags, the Mom's got "Mother of the ____" bags, the attendants got "Bride's Crew" bags, and I made myself a "Future Mrs" bag.
 |  |
 |  |
Water Bottle Labels
The water bottle labels were pretty simple. I found a template for water bottle labels on microsoft's website and opened it in power point. I then took a damask design background that I just found on google and inserted it in to the back. Added our monogram and nutrition label, and voila! Label done. Then in order to water proof them, we used packing tape as a sort of laminate. We "laminated" the labels and then used double sided tape to attach them.

